


Disaster Recovery Tests
Supported platforms:
Disaster Recovery Testing lets you run Gremlin experiments on targets spanning your entire Gremlin organization, not just your team. This lets you perform experiments on a significantly larger scale, such as testing availability zone and region failures. Disaster Recovery Testing helps validate failover processes, disaster recovery plans, and incident response procedures across your organization’s teams and services.
Overview
A Disaster Recovery Test consists of:
- The Scenario that you want to run.
- The services that you want to be targeted by the selected Scenario.
- Optionally, one or more Health Checks to run for the duration of the testing event.
When running the Disaster Recovery Test, Gremlin executes the Scenario on each included service. If any Health Checks are defined, Gremlin runs them continuously for the duration of the test.
Creating a Disaster Recovery Test
To create a new Disaster Recovery Test:
- Log in to the Gremlin web app.
- Select Disaster Recovery from the left-hand navigation menu.
- Click + New Disaster Recovery Test, then continue following the instructions below.
1. Selecting your services
First, select the services to include in the Disaster Recovery Test by checking the box next to the service name. You can use the search box to filter the list by service name, owning team, or tag. Alternatively, use the checkbox at the top of the table to select all services shown.
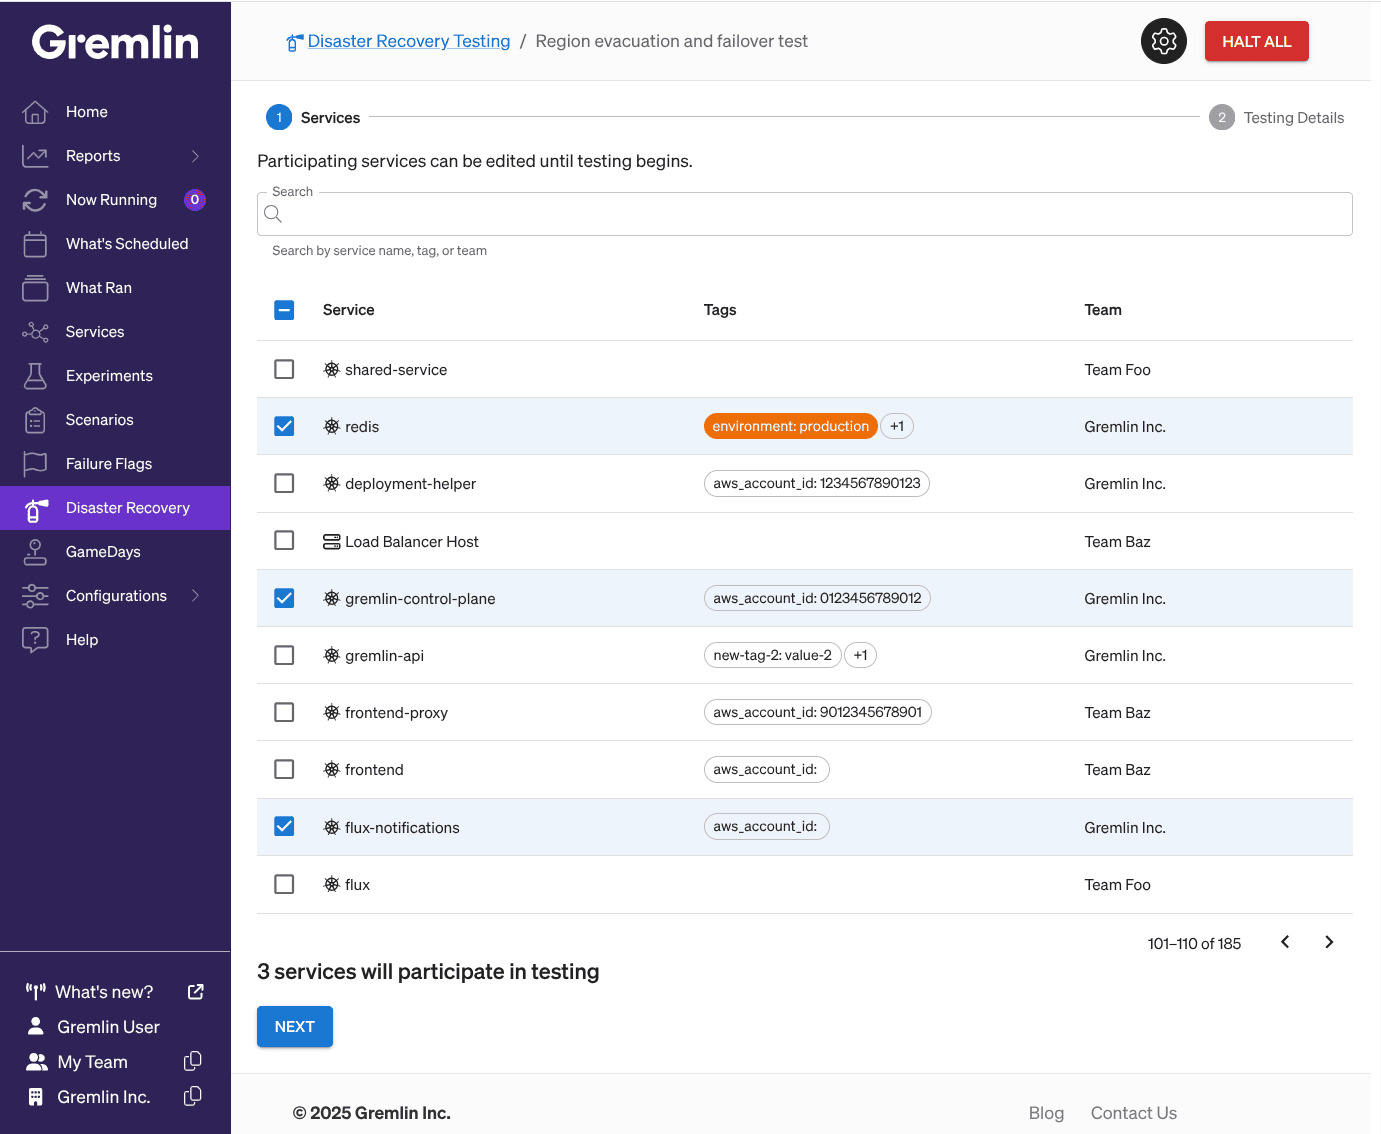
Once you’ve selected your target service(s), click Next.
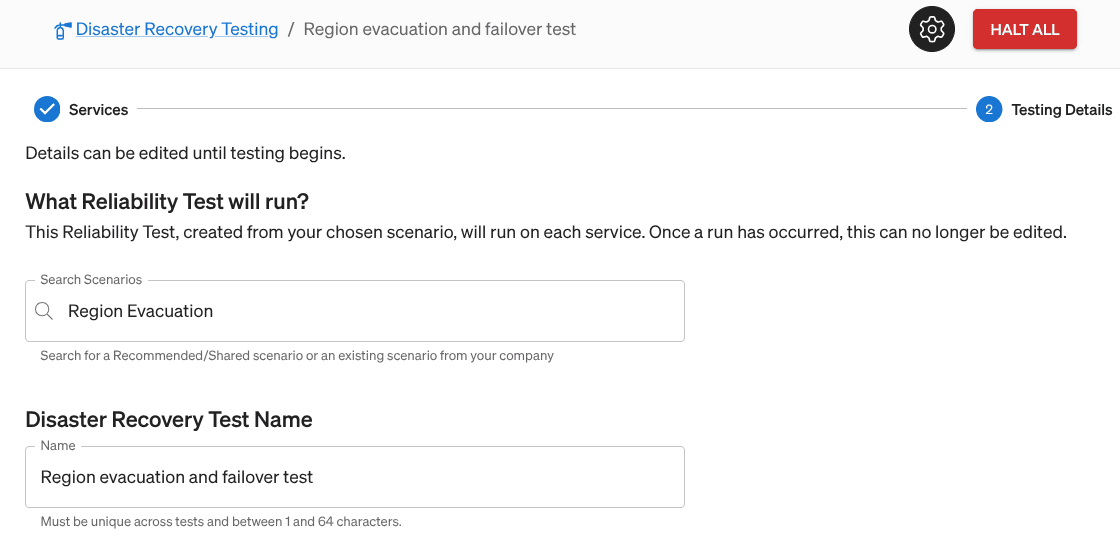
2. Selecting your Scenario
A Scenario is a workflow consisting of one or more Gremlin experiments. Scenarios can contain multiple experiments and run them sequentially or in parallel. To select a Scenario, click on the Scenario drop-down list to select from the Scenarios in your Company. Then, enter a name for the Disaster Recovery Test.
Override fields
Some Scenarios require additional information in order for them to run. Gremlin will automatically display the necessary input fields if you select a Scenario that requires additional information. These fields will depend on the type of experiment(s) included in the Scenario:
- DNS: the target DNS server.
- Zone redundancy: the zone to drop traffic to.
- Failure Flags: the selector(s) and attribute(s) of the Failure Flag(s) you want to run the Scenario on.
Note that you will not be able to create the Disaster Recovery Test until these fields have been completed.
3. Adding a Health Check
Disaster Recovery Tests also support Health Checks, which are automated checks that monitor a metric, alert, or other observability signal during testing. If the signal becomes unavailable, reports an alarm state, or meets a condition that you define, the Health Check immediately stops active runs for the Disaster Recovery Test, allowing all services to return to their regular operations.
To add a Health Check:
- Click the Include Disaster Recovery Test level Health Checks checkbox.
- Select your desired Health Check(s) using the Health Checks dropdown. Once you’ve selected the one you want, click + Add.
- Add any additional Health Checks.

4. Creating the test
Once you’ve configured the test, click the Create Disaster Recovery Test button. This brings you to the Disaster Recovery Test overview page, where you can run your test.
Running a Disaster Recovery Test
There are two ways to run a Disaster Recovery Test:
- Running the Disaster Recovery Test on all services.
- Running the Disaster Recovery Test on an individual service.
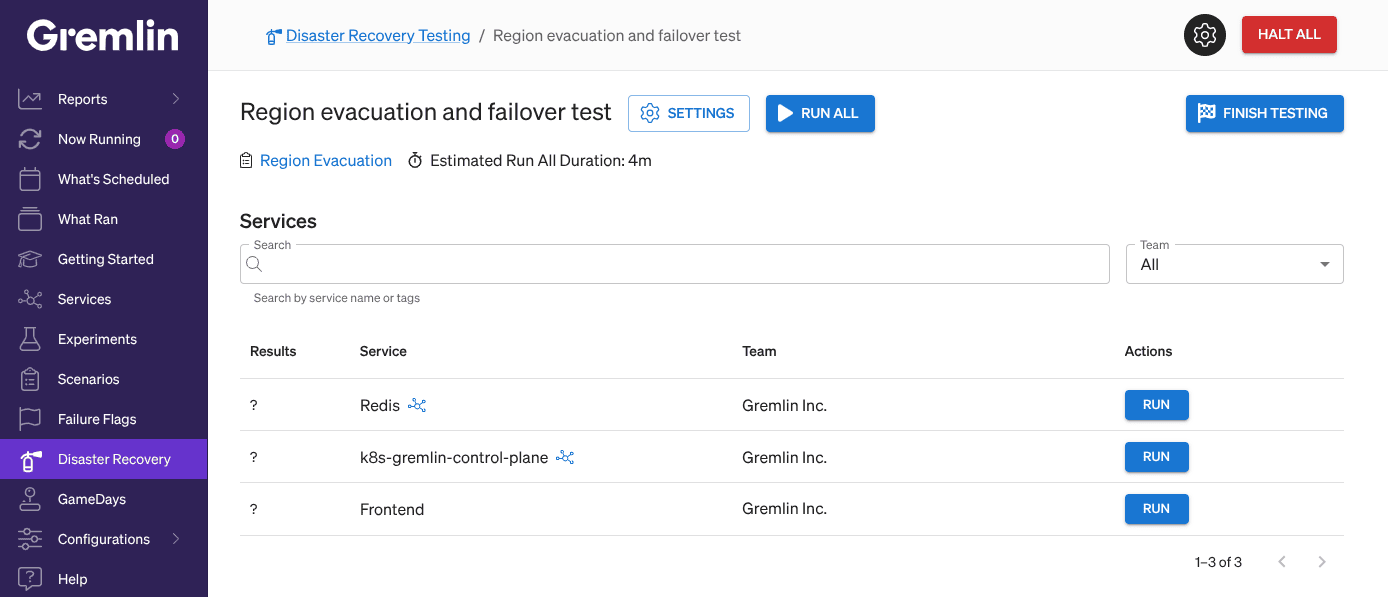
Running on all services
To run the Disaster Recovery Test on all services, click the Run all button at the top of the page. The “Estimated Run All Duration” indicates approximately how long it will take to complete the entire test.
Running on an individual service
To run the Disaster Recovery Test on an individual service, click the Run button next to the name of the service you want to test.
Completing the test
Once you’ve finished testing, click the Finish Testing button. This ends the test, generates a report showing its outcome, and prevents additional tests from being run. For more information on the report, see Understanding Disaster Recovery Test results.
Halting a Disaster Recovery Test
You can stop a Disaster Recovery Test at any time in one of three ways:
- Click the Halt All button at the top of the Gremlin web app. This stops all active experiments across your Gremlin Company.
- Click the Halt Testing button at the top of the Disaster Recovery Test page. This stops testing for this specific Disaster Recovery Test.
- Click the Halt button next to a service running the Disaster Recovery Test. This stops testing for this specific service, but continues testing on other services.
Understanding Disaster Recovery Test results
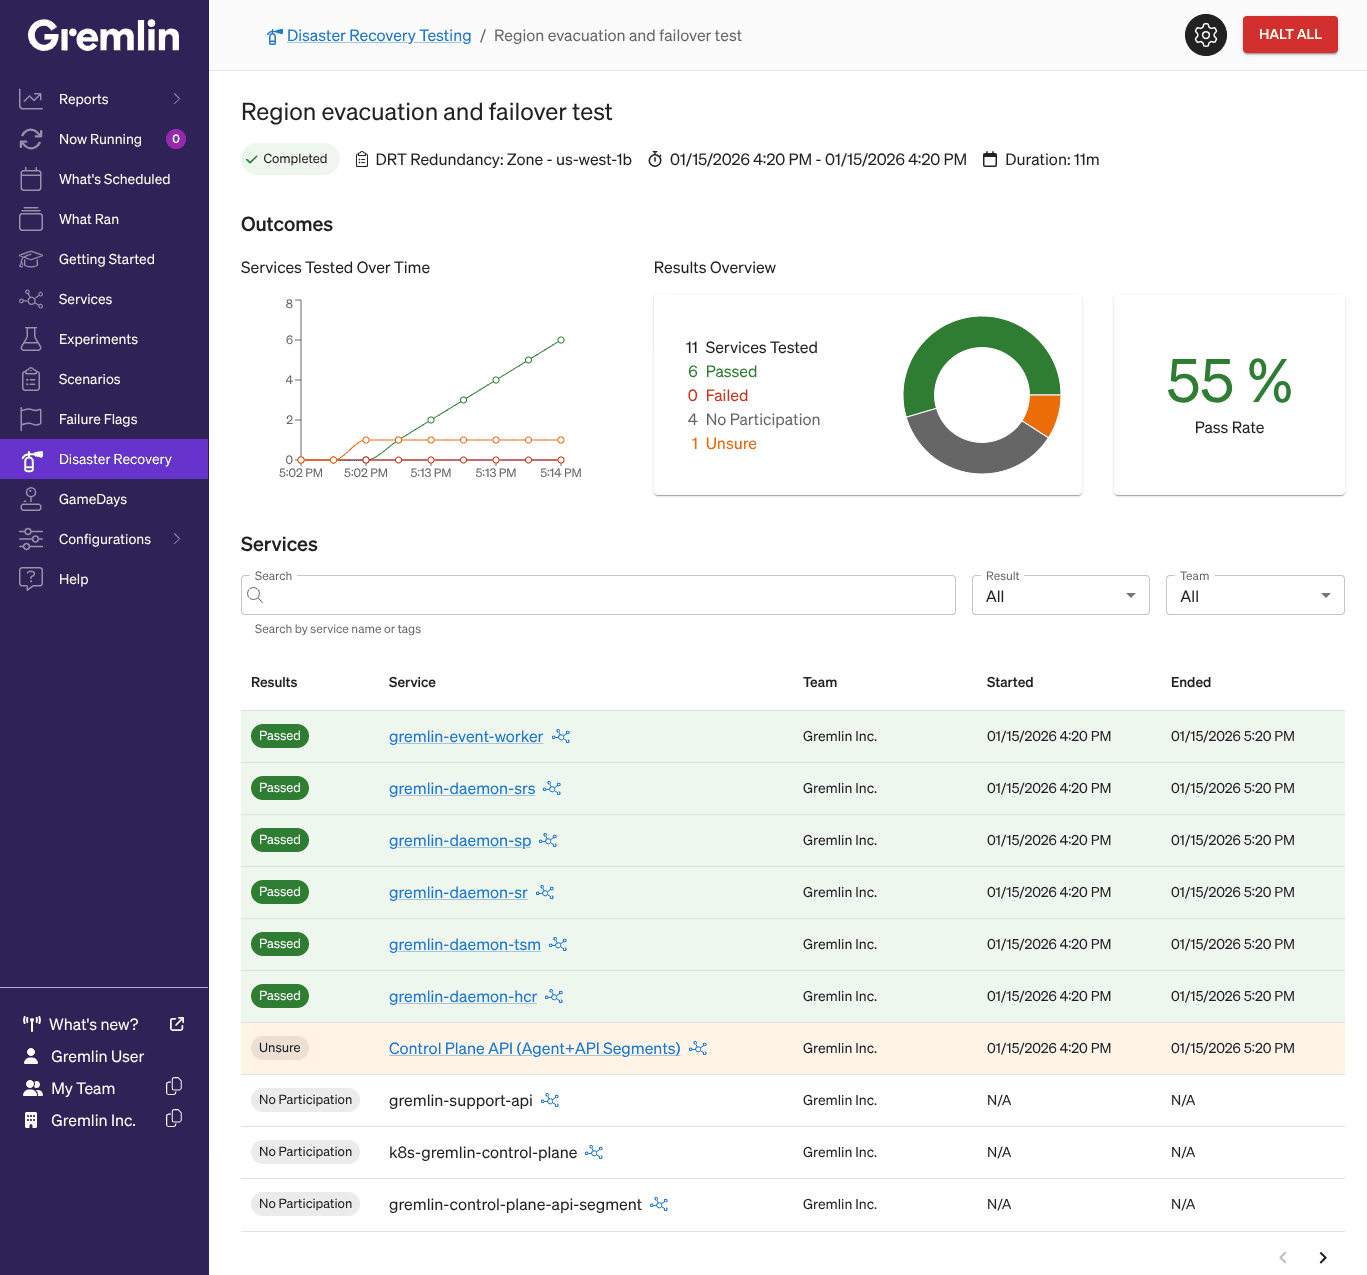
When you complete a Disaster Recovery Test by clicking Finish Testing, Gremlin generates a results screen showing the outcome of the test.
At the top of the page are the name of the Scenario used for the test and the duration of the test. A summary of the test results is shown under Outcomes. Each service can have one of four results:
- Passed: the test completed with no Health Checks fired.
- Failed: the test was stopped due to a Health Check.
- No Participation: the test did not run on the service.
- Unsure: the test was attempted, but could not be completed. This could indicate a problem with running the test.
The Services table lists each service included in the Disaster Recovery Test along with its result. You can view more details about the result by clicking on the service name. If the service belongs to a different team, Gremlin will prompt you to switch to that team.
Under the More Details section, you can see the Health Check(s) included in the Disaster Recovery Test, as well as the Scenario used to test each service.
Editing a Disaster Recovery Test
To edit a Disaster Recovery Test, open the Disaster Recovery Testing page, click on the Disaster Recovery Test you wish to edit, then click the Settings button at the top of the page. On this page, you can change the name of the Disaster Recovery Test, add or remove services, change the reliability test that runs, and add or remove Disaster Recovery Test-level Health Checks.
Make your desired changes, then click Save.
Deleting a Disaster Recovery Test
To delete a Disaster Recovery Test, open the Disaster Recovery Testing page, click on the Disaster Recovery Test you wish to delete, and then click Settings. Click Delete Disaster Recovery Test, then confirm.
Copying a Disaster Recovery Test
To copy a Disaster Recovery Test, open the Disaster Recovery Testing page, find the Disaster Recovery Test you wish to copy, and then click Clone. Follow the directions in Creating a Disaster Recovery Test, making any desired changes to the Disaster Recovery Test.