
CPU limits are one of the first guardrails most teams add to a Kubernetes manifest. Set resources.limits.cpu: 200m, and you can trust that the container will never use more than a fifth of a core…right?
That’s not always the case. A CPU limit is a request, not a restriction: the kubelet can ignore it, and if that happens, the container is free to use as much CPU time as it wants. Meanwhile, the limits still show up in your pod specification, your dashboards, and your code repository, making it seem as though it’s in effect.
In this blog, we’ll explain how Kubernetes enforces CPU limits, why teams sometimes turn enforcement off, what this means for your pods, and how to find and fix nodes that aren’t enforcing limits.
How Kubernetes enforces CPU limits
When you set a CPU limit on a container, the kubelet translates it into a Completely Fair Scheduler (CFS) quota in the container’s cgroup. The quota caps how much CPU time the container can use during each scheduling period (100ms by default). For example, a 200m limit equates to 20ms of CPU time during each 100ms period. Once the container uses its quota, the kubelet throttles it until the next period.
This is controlled by a kubelet setting: the --cpu-cfs-quota flag, or cpuCFSQuota in the kubelet configuration file. Quotas are enabled by default in upstream Kubernetes and on managed providers like Amazon Elastic Kubernetes Service (EKS), Azure Kubernetes Service (AKS), and Google Kubernetes Engine (GKE).
Since quotas are a kubelet-level setting, disabling it turns off quota limits for every container running on that node. You can confirm this from inside a container (assuming cgroup v2):
A container with an enforced 200m limit returns 20000 100000 (20ms of every 100ms). A container on a node with CFS quotas disabled returns max 100000, which means there’s no cap on the amount of CPU that container can use regardless of what the pod spec says.
Why are unenforced CPU limits a reliability risk?
The risk isn’t necessarily that the container has no limit. Teams can deliberately choose to run pods without limits for any number of reasons. The risk is that engineers think there’s a limit because it’s in the container's manifest.
When CFS quotas are disabled, a container with a set limit can nonetheless consume every core on the node. CPU requests still apply, so containers get a share proportional to their requests, but anything above that share is fair game. A runaway process, a traffic spike, or a bug in one workload can starve processes that don’t have CPU reserved. With a set limit and no quota, the manifest becomes misleading, which can impact capacity planning, incident response, and testing. Engineers assume a level of usage that could be grossly underestimated when running in production.
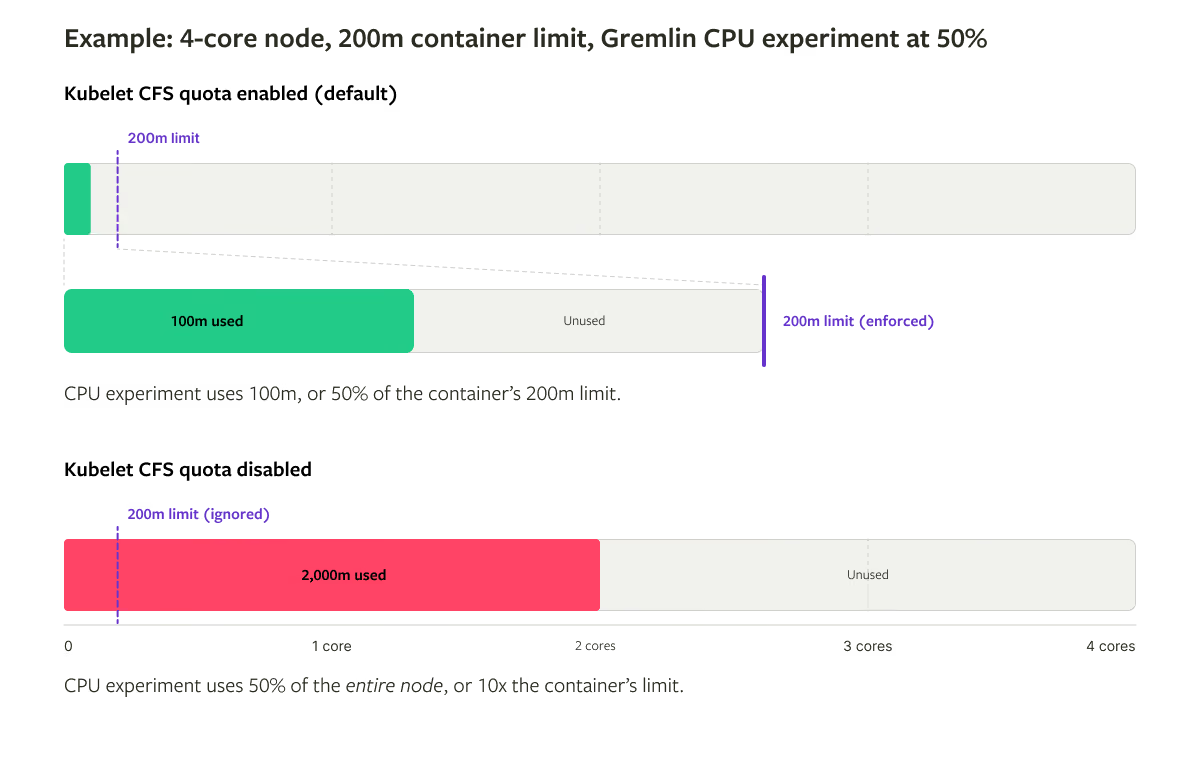
This also changes the behavior of Gremlin tests. Gremlin’s CPU experiment impacts a percentage of CPU based on the total CPU available to its target. For containers with a defined limit running on a node with quotas enabled, this percentage is based on the limit. For containers running on nodes with quotas disabled, this percentage is based on the node’s entire CPU capacity.
For example, imagine a Kubernetes worker node with four CPU cores and a container with a 200m CPU limit. We want to run a CPU experiment on the container that increases its total CPU usage to 50%. With quotas enabled, this works as expected: CPU usage increases to 50% of the 200m limit, which is 100m. This leaves the vast majority of the CPU free for other processes. But if quotas are disabled, this 50% is now 50% of all CPU cores on the node, leaving only 2,000m for other processes.
Why do teams disable CFS quotas?
In some cases, CFS throttling can cause latency spikes, especially for multi-threaded applications. A container with several busy threads can burn through its quota early in a period and remain throttled for the rest of it, even when the node has idle CPU. For latency-sensitive services, this can appear as unexplained tail latency.
Disabling CFS quotas at the node level mitigates this. The risk comes when quotas are disabled, but workloads still declare CPU limits. This suggests an engineer isn’t aware of the disabled quotas and expects those limits to be applied.
There are alternative approaches to disabling CFS quotas, such as:
- Raising CPU limits on the affected workloads so they have headroom for bursts.
- Removing CPU limits from specific latency-sensitive workloads and using CPU requests instead.
- Running latency-sensitive workloads on a dedicated node pool with its own configuration.
How to find nodes with unenforced CPU limits
First, check whether the kubelet on a given node has CFS quotas enabled. You can query the kubelet’s configuration through the API server (this requires access to the nodes/proxy resource):
If this returns false, CPU limits aren’t enforced on that node. You can also check the kubelet’s configuration file (usually /var/lib/kubelet/config.yaml) for the setting cpuCFSQuota: false.
Next, find pods that declare CPU limits, along with the node(s) they’re running on:
Each pod returned by this command that is running on a node with cpuCFSQuota: false has a limit that isn’t being enforced and is therefore at risk.
You can also use Gremlin’s Detected Risks feature to scan for this automatically. For this specific risk, Gremlin checks two things for each Kubernetes service:
- Whether the service’s containers declare a CPU limit.
- Whether the nodes the service’s containers run on have CFS quotas disabled.
If both are true, Gremlin flags the service as “at risk.” If you’ve disabled quotas and removed CPU limits, Gremlin won’t flag it, since that’s a deliberate configuration. You can also exclude the risk from your test suite if you’ve intentionally configured your cluster this way and don't want it to impact your reliability score.
How to re-enable CPU limit enforcement
Before you start, right-size your CPU limits. Once enforcement is back on, any limit that’s set too low will start throttling its workload. For each of the workloads you found above, review their actual CPU usage and raise limits where needed. Otherwise, you’ll trade one reliability risk for another.
Next, set cpuCFSQuota back to true in your kubelet’s configuration. This will vary depending on how your cluster is managed.
Set cpuCFSQuota on managed Kubernetes services
On managed Kubernetes services, this is a node pool setting, and applying it will recreate or restart the pool’s nodes.
Amazon Elastic Kubernetes Service (EKS): Set the kubelet configuration in your node group’s launch template. On Amazon Linux 2023 nodes, add it to the NodeConfig in your user data:
Azure Kubernetes Service (AKS): Use a custom node configuration with "cpuCfsQuota": true in your kubelet configuration file:
Google Kubernetes Engine (GKE): Create a node system configuration file:
Then apply it to the node pool:
Set cpuCFSQuota on self-managed Kubernetes
For self-managed Kubernetes clusters, set cpuCFSQuota: true in your kubelet configuration file and restart the kubelet. If quotas are still disabled, check your kubelet’s start command for the --cpu-cfs-quota=false flag and remove it or change it to true.
Restart your workloads
Re-enabling the setting doesn’t retroactively apply quotas to containers that are already running. Restart the affected workloads so the kubelet creates new containers with quotas:
Also, restart the Gremlin agent pod on each affected node to ensure it re-reads the kubelet configuration:
Verify the fix
Re-run the cpu.max check from earlier. A container with a 200m limit should now return 20000 100000 instead of max 100000. In Gremlin, the risk status will change from “at risk” to “mitigated,” and your service’s reliability score will update accordingly.
For stronger validation, run a CPU reliability test on the affected services. Kubernetes will throttle the container at its limit, and overall CPU usage on the node will be significantly lower than it was when quotas were disabled.
Other Kubernetes risks to watch out for
Unenforced CPU limits are a good example of a risk that’s invisible until something goes wrong: the configuration looks correct, and nothing fails until a workload's CPU usage is already too high. There are many other Kubernetes risks that are similarly easy to overlook, like missing liveness probes, unset resource requests, and missing topology spread constraints. To learn how to protect yourself against them at scale, check out our comprehensive ebook, “Kubernetes Reliability at Scale.”
In the meantime, if you’d like a free report of your reliability risks in just a few minutes, sign up for a free 30-day Gremlin trial and use Gremlin’s Detected Risks feature to automatically scan your clusters for unenforced CPU limits.
K8s Reliability at Scale
To learn more about Kubernetes failure modes and how to prevent them at scale, download a copy of our comprehensive ebook
Get the Ultimate Guide
How to keep your Kubernetes Pods up and running with liveness probes
How do you keep your Kubernetes Pods running reliably? Our latest blog is all about liveness probes: how they work, how to configure them, and how Gremlin verifies that they're keeping your containers alive.

Getting your applications running on Kubernetes is one thing: keeping them up and running is another thing entirely. While the goal is to deploy applications that never fail, the reality is that applications often crash, terminate, or restart with little warning. Even before that point, applications can have less visible problems like memory leaks, network latency, and disconnections. To prevent applications from behaving unexpectedly, we need a way of continually monitoring them. That's where liveness probes come in.
Read moreHow to ensure your Kubernetes Pods have enough CPU
How much CPU should you reserve for your Pod containers? Read this blog to learn how Gremlin can detect underprovisioned or missing CPU requests in your Kubernetes clusters.

A common risk is deploying Pods without setting a CPU request. While it may seem like a low-impact, low-severity issue, not using CPU requests can have a big impact, including preventing your Pod from running. In this blog, we explain why missing CPU requests is a risk, how you can detect it using Gremlin, and how you can address it.
Read moreOptimizing Kubernetes pod deployments for reliability with topology spread constraints
Topology spread constraints control how Kubernetes replicates pods across failure domains, like zones and regions. Learn how they work in this blog post.

Topology spread constraints let you determine how Kubernetes spreads pod replicas across failure domains, such as availability zones and regions. This blog explains how they work, how to configure them, and how to scan for missing constraints.
Read more