How to simulate a zone/region evacuation using Gremlin


.svg)
.svg)

 This is an older tutorial
In this tutorial, you’ll learn how to run an availability zone (AZ) evacuation experiment using Gremlin. An AZ evacuation is a test designed to test your ability to fail over your services from one datacenter zone to another. AZ failures can happen for several reasons, including:
- Human error
- Internet routing errors caused by failed or cut transmission cables (sharks are very curious about data cables)
- Natural disasters, like hurricanes, tornadoes, or floods
For this tutorial, we’ll use Amazon EC2 and Amazon ELB to demonstrate failing over. These same concepts apply to all other cloud platforms, including Azure and GCP.
Overview
This tutorial will show you how to:
- Deploy the Gremlin agent to AWS.
- Configure a Scenario to simulate an availability zone outage via a blackhole experiment.
- Use Health Checks to monitor whether the test is successful using Amazon CloudWatch.
Prerequisites
Before starting this tutorial, you’ll need:
- A Gremlin account (sign up for a free trial here).
- An AWS account with access to EC2 (you can use the lowest-tier x86 or Arm instance for this tutorial to save on costs).
- A demo application (this can be as simple as a default Nginx installation).
Step 1 - Deploy EC2 instances with the Gremlin agent
In this step, we’ll set up our environment by creating two EC2 instances and installing the Gremlin agent onto each of them. Instead of manually deploying the agent, we’ll use a userdata script to install and configure it for us.
First, log into the Gremlin web app and access your Team Settings by clicking on the account icon in the top-right corner of the page. Click on the Configuration tab. Next to “Client Configuration File,” click Download. This will download a YAML file named config.yaml containing everything you need to authenticate a Gremlin agent. Keep this file secret - anyone with access to it can add their own agents to your account!
Next, we’ll create our userdata script:
- Log into the AWS Console and open EC2.
- In the left-hand navigation menu, select Launch Templates.
- Click Create launch template.
- Give this template a name, such as “gremlin-launch-template”. You can also optionally give it a description if you choose.
- Under Application and OS Images (Amazon Machine Image), search for and select “Amazon Linux 2023 AMI” for x86. You can use a more recent version if you choose, but the steps may vary.
- Under Instance type, select “t2.micro” for free-tier eligible instances. You can choose a different instance type if you’d like, but you might incur charges.
- Under Key pair (login), you can optionally create or choose a key pair to use to log in. This isn’t required for this tutorial.
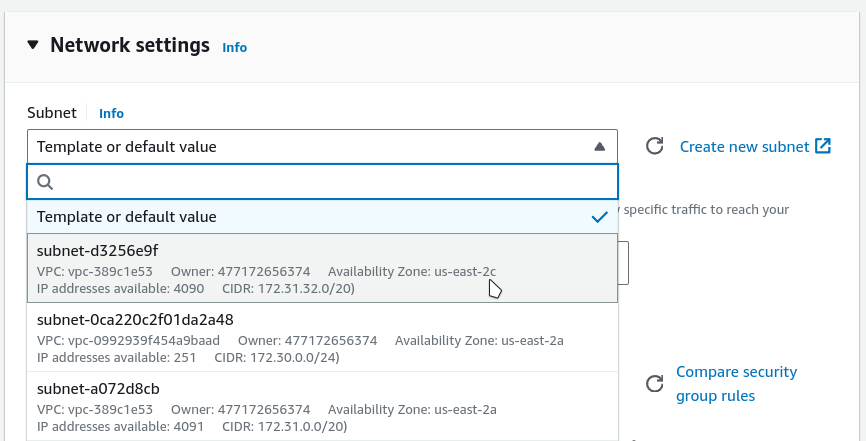
- Under Network settings, leave the subnet selection to “Don’t include in launch template.” No special settings are required for the security group, so you can select an existing group or create a new default one.
- Expand Advanced Details and scroll to the bottom of the section. You’ll see a User data text box. In this box, paste the following code. Replace
YOUR CONFIG.YAMLwith the complete contents of your config.yaml file (you can trim out any commented parts).
Click Create launch template to save the template, then return to the EC2 Dashboard.
Step 2 - Deploy two EC2 instances and an Elastic Load Balancer (ELB)
Next, we’ll deploy two EC2 instances in different availability zones.
- Next to Launch instances, click the down arrow and select Launch instance from template.
- Select the template you created in step 1.
- Under Network settings, select the subnet you want to create your instance in. Note down which Availability Zone (AZ) the subnet is in. You can see the AZ listed underneath the subnet name.
- Click Launch instance.
- Repeat steps 1–4, but choose a subnet in a different AZ. This is key to this experiment!
Now, we have two EC2 instances in two different AZs, but these instances are entirely independent of each other. We need to combine them into a single Target Group before we can create our load balancer. To create a Target Group:
- In the left-hand navigation menu, click Target Groups.
- Click Create target group.
- Select Instances as the target type.
- Give the group a name, such as “gremlin-nginx-group.”
- Select HTTP as the Protocol and IPv4 as the address type.
- Select the VPC that your instances are running in.
- Select HTTP1 as the Protocol version.
- Optionally, select the path you want to use for health checks. You can keep this set to the default, and it will check the default Nginx landing page every 30 seconds with a timeout threshold of 5 seconds.
- Click Next.
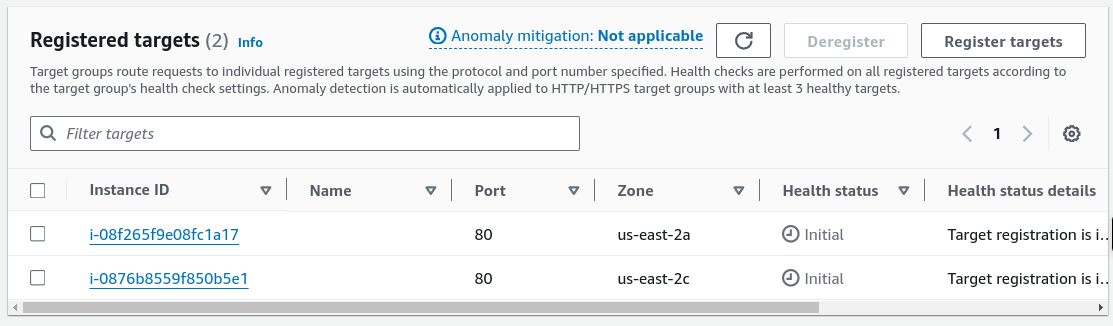
- On the Register targets screen, select the two instances you created previously, then click Include as pending below.
- Click Create target group to create the group.
Now, to direct network traffic between these nodes, we’ll need to create an Elastic Load Balancer.
- In the left-hand navigation menu, click Load Balancers.
- Click Create load balancer.
- Under Application Load Balancer, click Create. We’re using an ALB because we only need to direct HTTP traffic.
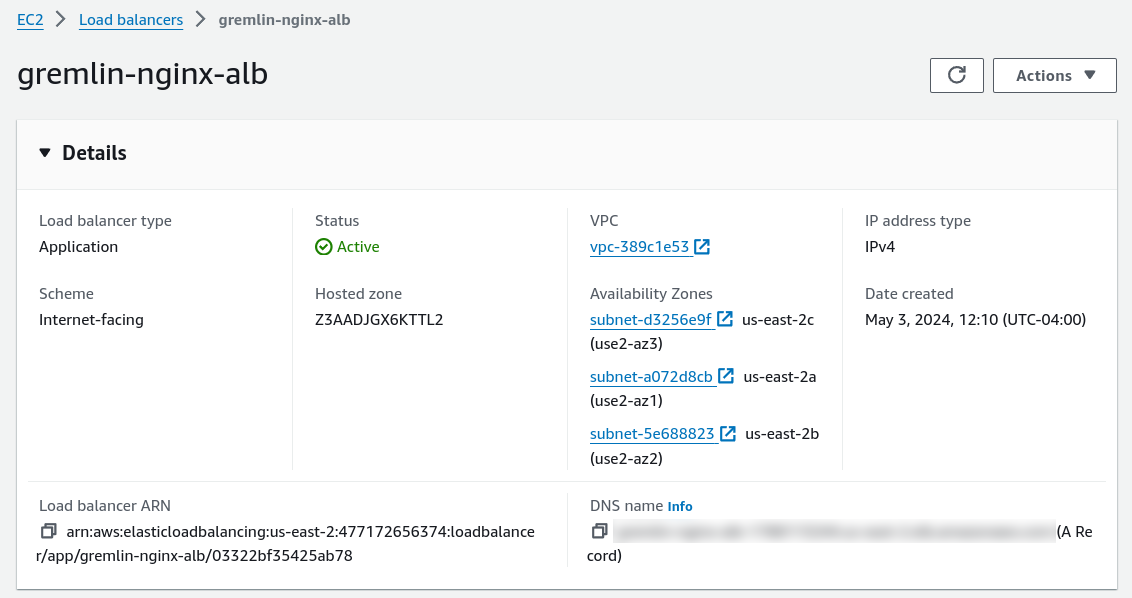
- Give your load balancer a name, such as “gremlin-nginx-alb.”
- Make sure Scheme is set to “Internet-facing,” and IP address type is set to “IPv4.”
- Under Network Mapping, select the VPC that your EC2 instances are running in. Under Mappings, select both of the AZs that your instances are running in.
- Select the Security groups that your instances are running in.
- Under Listeners and routing, change the Protocol to HTTPS. Then, select your target group as the Forward to target. If you don’t see the group in the list, you might need to click the refresh button to the right of the box.
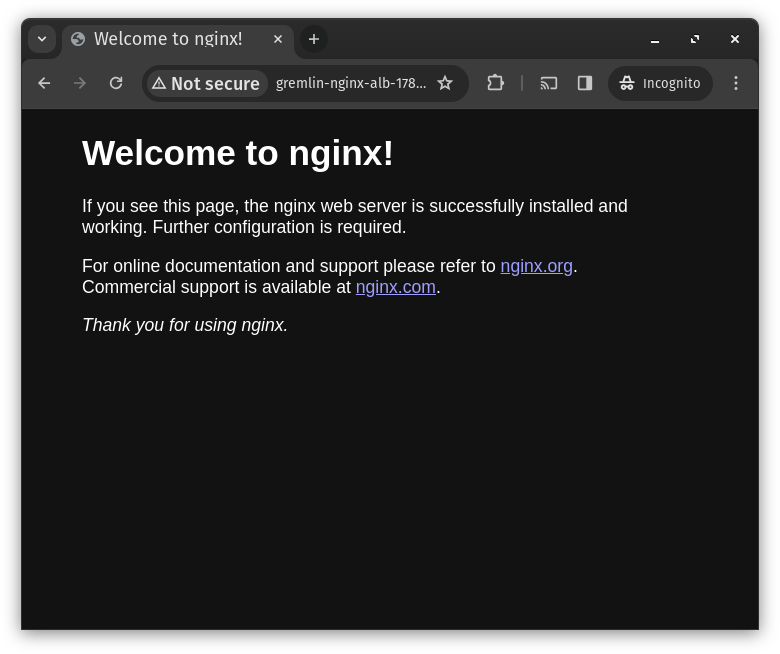
Now, if you enter the DNS name of your ALB into your browser, you’ll see the default Nginx page appear.
Step 3 - Configure and run a Zone Evacuation Scenario
Now for the fun part: we get to test our redundancy system using a Gremlin Scenario!
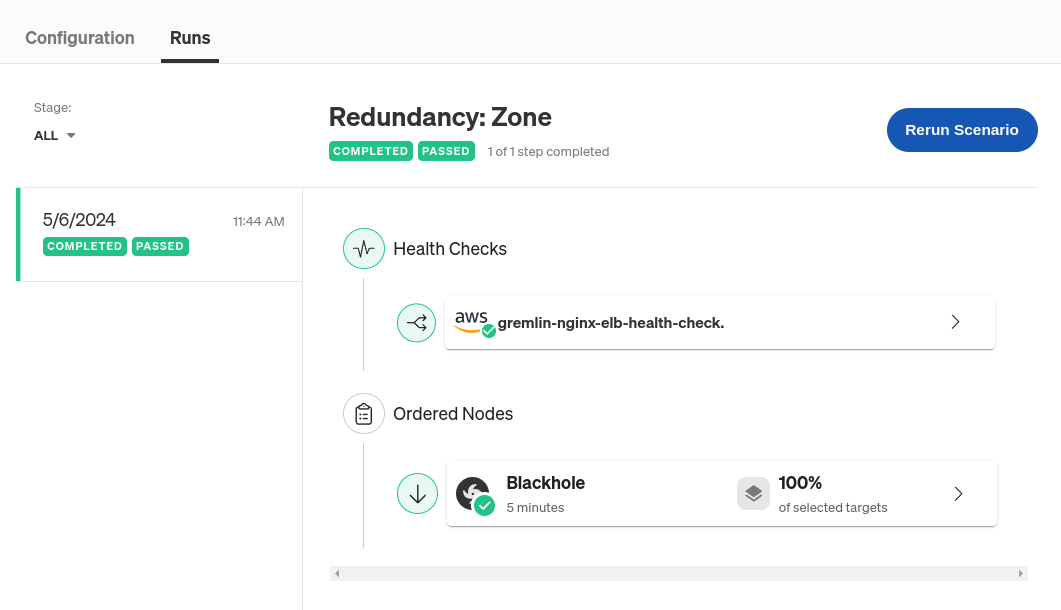
We’ll use the Redundancy: Zone Recommended Scenario. This is a simple Scenario that runs a blackhole experiment on the selected AZ for five minutes. A blackhole experiment drops network traffic to and from the selected targets—in this case, it’ll block traffic to any nodes located within the target AZ. When the experiment runs, it’ll block network traffic on one of our EC2 instances, which the load balancer will detect when it runs its next health check, causing it to fail over traffic to our backup instance. At least, that’s the expectation. This test will determine whether that works in practice.
We can also add a Health Check to this Scenario. This Health Check can monitor our application (i.e. our Nginx instance) to ensure it’s still available during this test. If for some reason our load balancer fails, or both EC2 instances go offline instead of just one, the Health Check will detect this and immediately stop the Scenario, returning our systems back to normal. This is also how we’ll determine whether we passed or failed the Scenario, and by extension, whether or not we’re zone redundant.
To create the Health Check (you can skip this step if you choose):
- In the AWS Console, navigate to CloudWatch.
- In the left-hand menu, expand Alarms, then click All alarms.
- Click Create Alarm.
- Click Select metric, then search for “unhealthystaterouting”. Select the one corresponding to Per AppELB, per TG, then click Select metric.
- Change the Statistic to Maximum and reduce Period to 10 seconds. Under Conditions, select Static, then Greater/Equal, and lastly, set than… to 2. This configures the alarm so that it fires if both instances are unable to be routed to.
- Click Next.
- Remove the pre-defined alarm state trigger. There should be no actions taken as a result of this alarm. Click Next.
- Give your alarm a name and optionally a description, then click Next.
- Confirm your choices, then click Create alarm.
Now, to configure and run the Scenario:
- Log into the Gremlin web app.
- Click on this link to open the Scenario, or navigate to Scenarios, then Recommended, then “Redundancy: Zone.”
- Click Customize.
- If you created an alarm in the previous step, click Add Health Check, then click Manage Saved Health Checks.some text
- Click + Health Checks to create a new Health Check.
- For the Observability Tool, select AWS. If you haven’t yet authenticated Gremlin with your AWS account, you can do so by following the instructions in the docs, or by following step 3 in this tutorial. After you’ve authenticated, click Next.
- Provide a Name for this Health Check, such as “gremlin-nginx-elb-health-check.”
- Select Create a Health Check from an AWS CloudWatch Alarm URL, and copy the URL for your newly created alarm into the Monitor or Alert URL text box. Click Test Health Check to confirm that Gremlin can read your alarm, then click Save Health Check.
- Back in the Scenario creation screen, select your newly created alarm from the Use a Health Check from your team’s library drop-down, then click Update Scenario.
- Next to the blackhole experiment, click the menu button, then click Edit.
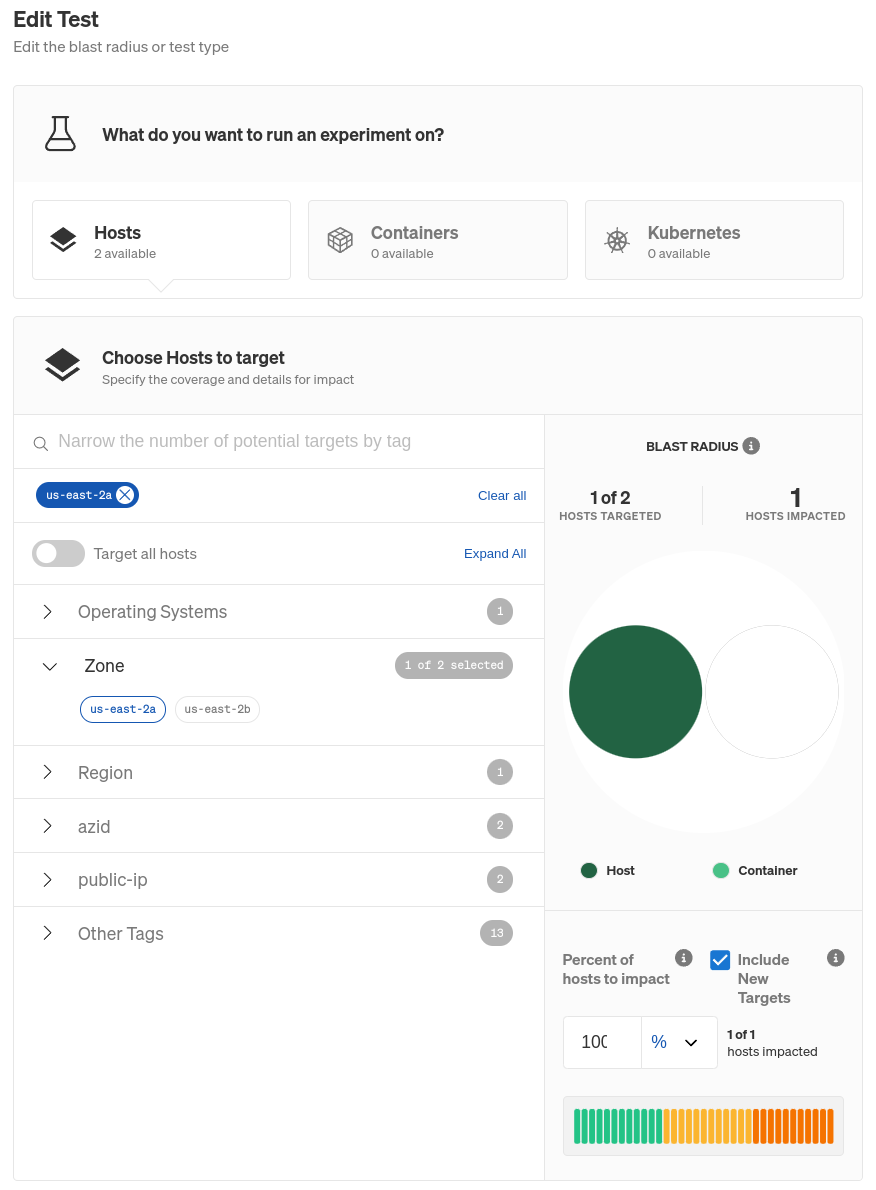
- Under Hosts, click the Selectors tab, then expand the Zone tab (or Region tab, if you want to do a region evacuation) and select the AZ you want to cause the failure in. Check the screenshot below for an example.
- Scroll down and click Update Scenario, then click Save Scenario.
- Finally, click Run Scenario to start the Scenario.
While the experiment spins up, Gremlin checks our CloudWatch monitor to ensure our systems are healthy. Both systems are still up and routable, so the alarm hasn’t been fired, and by extension, Gremlin keeps the Scenario running. The blackhole experiment lasts for five minutes, which is more than enough time for AWS to detect a failure, trigger the alarm, and for Gremlin to detect the alarm state. If it turns out that both instances become unresponsive and the alarm fires, Gremlin will immediately halt the Scenario and return both systems back to normal operation.
Fortunately, the test was completed successfully. Because we had both instances set up in separate AZs, our load balancer was still able to route requests to the healthy instance. We can confirm that our first host was unavailable by viewing our alarm in CloudWatch and checking the history:

Conclusion
Congratulations on running your first zone redundancy test! From here, you can try changing your experiment to test different scenarios. For example, use a latency experiment in place of a blackhole experiment to see how your environment behaves under poor network connections. Does the load balancer struggle to determine a node’s health when it’s slow, rather than unresponsive? Does it accidentally route traffic to unhealthy nodes? If you want to add another dimension to this experiment, use one of Gremlin’s resource experiments to simulate load on one instance while making the other instance unavailable.
Length:
10 minutes
Experiment(s):
Blackhole
Avoid downtime. Use Gremlin to turn failure into resilience.
Gremlin empowers you to proactively root out failure before it causes downtime. See how you can harness chaos to build resilient systems by requesting a demo of Gremlin.

.svg)