How to create a Kubernetes pod disruption budget using Gremlin


.svg)
.svg)

 This is an older tutorial
Introduction
In this tutorial, we'll show you how to create and validate a pod disruption budget (PDB) for a Kubernetes application. We'll walk through creating a PDB for a replicated Deployment, deploying the Gremlin Kubernetes agent, running a Shutdown attack on a node, then validating that Kubernetes enforces our PDB.
By reading this tutorial, you'll learn how to create a PDB and validate that it works as expected by running a Shutdown attack.
Want more? Check out our comprehensive eBook, "Kubernetes Reliability at Scale."
Overview
This tutorial will show you how to:
- Step 1 - Deploy a multi-node Kubernetes cluster
- Step 2 - Deploy the Gremlin Kubernetes agent
- Step 3 - Deploy an application with a Pod Disruption Budget
- Step 4 - Run a Shutdown experiment to validate your Pod Disruption Budget
Background
In Kubernetes lingo, anything that could potentially interrupt the operation of a Pod is called a disruption. This can be anything from a system crash causing a node to reboot, to an SRE accidentally typing <span class="code-class-custom">kubectl delete</span> instead of <span class="code-class-custom">kubectl apply</span> . If a disruption is caused by an operator—such as deleting a Deployment or draining a node—it's known as a voluntary disruption.
A pod disruption budget (PDB) lets application owners set requirements around Deployments so that they're less likely to be impacted by voluntary disruptions. In essence, it lets you define the minimum tolerable operational requirements for a Deployment so that it remains stable even during a disruption.
For example, imagine we have a Deployment that contains four replicas distributed evenly across four nodes. We can tolerate losing one Pod, but not two, so we create a PDB that requires a minimum of three replicas:
We want to scale down our cluster to save costs, so we reduce our node count to two. However, this would also reduce the size of the <span class="code-class-custom">my-app</span> Deployment to two replicas. Kubernetes recognizes this, and because of the PDB, creates a new instance of the Deployment on one of the remaining nodes. This ensures that there are at least three replicas and allows the nodes to terminate.
Note that disruption budgets only work for voluntary disruptions. Involuntary disruptions (like power outages) require other forms of fault tolerance, such as replication. This shutdown example also assumes your cluster supports graceful node shutdowns.
Prerequisites
Before starting this tutorial, you'll need the following:
- A Gremlin account
- A Kubernetes cluster with at least two worker nodes
- The kubectl command-line tool
- The Helm command-line tool
Step 1 - Deploy a multi-node Kubernetes cluster
For this tutorial, you'll need a Kubernetes cluster with at least two worker nodes. If you already have a cluster, you can continue to step 2. If not, you can create your own cluster using a tool like kubeadm or K3s, or use a cloud Kubernetes platform like Amazon EKS, Azure Kubernetes Service, or Google Kubernetes Engine.
Once your cluster is deployed, verify that you have at least two actively running worker nodes by using <span class="code-class-custom">kubectl get nodes</span> :
Step 2 - Deploy the Gremlin Kubernetes agent
The Gremlin Kubernetes agent is the recommended method of deploying Gremlin to a Kubernetes cluster. It allows Gremlin to detect resources such as Pods, Deployments, and DaemonSets, and select them as targets for running experiments.
To install the agent, follow the installation instructions in the documentation. Make sure to replace <span class="code-class-custom">$GREMLIN_TEAM_ID</span> with your actual team ID, <span class="code-class-custom">$GREMLIN_TEAM_SECRET</span> with your team secret key, and <span class="code-class-custom">$GREMLIN_CLUSTER_ID</span> with a uniquely identifying name for this cluster. You can learn more about team IDs and secret keys in the Authentication documentation.
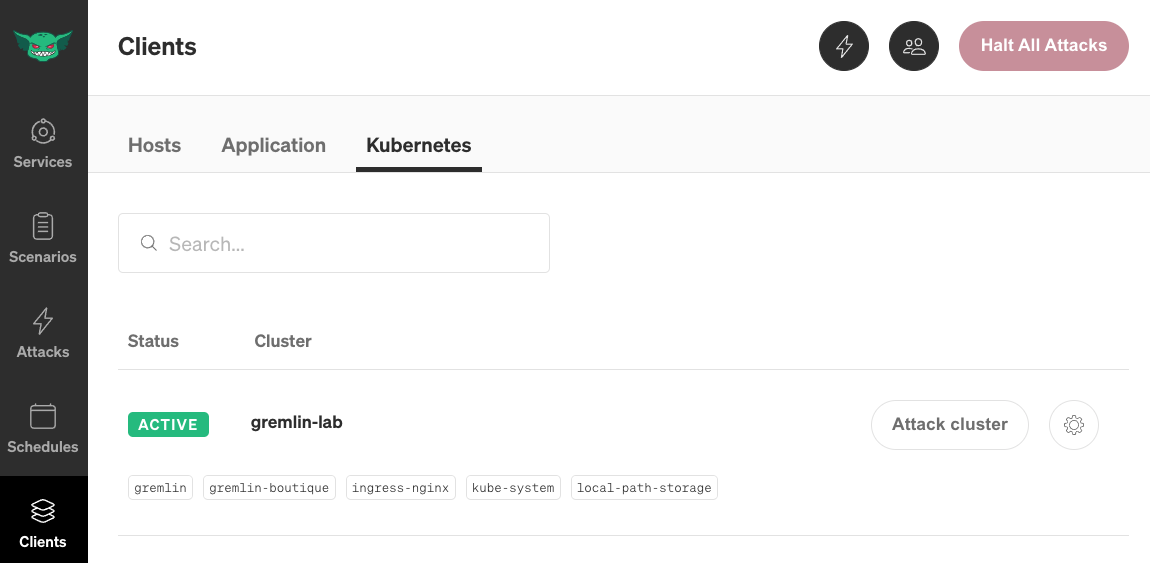
Once the agent has been installed, you can confirm that it's working correctly by logging into your Gremlin account, opening the Clients page, then clicking the Kubernetes tab. Your cluster will be listed with the name provided by <span class="code-class-custom">$GREMLIN_CLUSTER_ID</span> :
Step 3 - Deploy an application with a Pod Disruption Budget
Next, let's deploy an application and create a Pod Disruption Budget. For this example, we'll use the open source Online Boutique demo application created by the Google Cloud Platform team. Online Boutique is an open source e-commerce website consisting of 12 services, each one in its own Deployment. To deploy the application, either read the quick start guide or simply run the following command:
You can check on the status of the deployment by running:
By default, each microservice only deploys a single replica. We're going to pick a service to create a PDB for: for this tutorial, let's use the <span class="code-class-custom">frontend</span> service and increase the replica count to 2:
Next, let's create our PDB. Our PDB will ensure that there are always at least 2 replicas running at any given time. This should prevent us from shutting down one of our nodes if the number of remaining Pods is less than 2:
Save this file as <span class="code-class-custom">frontend-pdb.yaml</span>, then apply it to your cluster:
You'll see the following output:
Step 4 - Run a Shutdown experiment to validate your Pod Disruption Budget
The final step is to ensure your PDB works by running an experiment. We'll use a Shutdown attack on one of our worker nodes and monitor both the node and our frontend Deployment to see whether our PDB is honored.
First, log into the Gremlin web app and create a new attack by navigating to Attacks, then New Attack. Select the Infrastructure tab, then selects Hosts (if not already selected). Select one of your worker nodes, or select all of your worker nodes and change the Percent of targets to impact to <span class="code-class-custom">50</span> (you could also enter <span class="code-class-custom">1</span> and use the drop-down to select # instead of %).
Next, click on Choose a Gremlin to expand the attack selection box, select the State category, then select Shutdown. Reduce the Delay to <span class="code-class-custom">0</span> to immediately start the attack, and make sure Reboot is checked. Finally, click Unleash Gremlin to run the attack.
While the attack is starting, open a terminal and retrieve the state of your PDB by using the command <span class="code-class-custom">kubectl get poddisruptionbudgets frontend-pdb -o yaml</span>. This should return something similar to the following:
Note the <span class="code-class-custom">currentHealthy</span> and <span class="code-class-custom">disruptionsAllowed</span> fields, as these will tell us the number of actively running Pods and the maximum number of failed Pods allowed respectively.
Meanwhile, we should also monitor the status of our nodes by using kubectl or an external monitoring tool:
What we should see is <span class="code-class-custom">currentHealthy</span> fall no lower than 2, even if it means one of our workers takes longer to shutdown. Ideally it should remain at 3 as Kubernetes reschedules replicas onto the remaining worker node. If it goes down to 1, then we can assume both workers shutdown despite our settings, and we should therefore recheck our PDB configuration or reevaluate our application deployment strategy.
Conclusion
In this tutorial, we used Gremlin to ensure that our deployments can withstand voluntary disruptions in our Kubernetes cluster. Our applications are ready to autoscale, deploy onto Spot instances, and handle even large-scale cluster disruptions. To learn more about Shutdown attacks, read our blog on Getting started with Shutdown attacks.
Avoid downtime. Use Gremlin to turn failure into resilience.
Gremlin empowers you to proactively root out failure before it causes downtime. See how you can harness chaos to build resilient systems by requesting a demo of Gremlin.

.svg)