How to simulate missing and failed dependencies using Gremlin


.svg)
.svg)

 This is an older tutorial
In this tutorial, you’ll learn how to simulate a failed dependency using Gremlin. A dependency is any computing component (typically a service) that another service requires in order to perform a function. For example, a database is a dependency of any service that stores data in it.
Dependency failures can happen at any time and for any reason, yet engineers often treat them as if they have 100% availability. This is especially true for SaaS and cloud services, which stand to lose millions of dollars for even a minute-long outage. While the teams managing our dependencies are strongly motivated to keep those dependencies online, downtime is always a possibility. Engineers need to ensure that their applications can stay online even when their dependencies can’t.
For this tutorial, we’ll use a simple Node.js application running on an Amazon EC2 instance, with Amazon RDS as a dependency. These same concepts apply to all other cloud platforms, including Azure and GCP.
Overview
This tutorial will show you how to:
- Deploy the Gremlin agent to an EC2 instance.
- Create an Amazon RDS database and connect a Node.js application to it.
- Run a blackhole experiment to simulate an Amazon RDS outage.
Prerequisites
Before starting this tutorial, you’ll need:
- A Gremlin account (sign up for a free trial here).
- An AWS account with access to EC2 (you can use the lowest-tier x86 or Arm instance for this tutorial to save on costs).
- A demo application (we’ll use this Node.js application provided by the MariaDB team).
- A Mac, Linux, or WSL (Windows Subsystem for Linux) workstation.
Step 1 - Deploy an EC2 instance with the Gremlin agent
We’ll start by creating an EC2 instance with both the Gremlin agent and a Node.js application running on it. We need to be able to authenticate the Gremlin agent to our Gremlin account, and we can do that using a client configuration file.
- Log into the Gremlin web app and access your Team Settings by clicking on the account icon in the top-right corner of the page.
- Click on the Configuration tab.
- Next to “Client Configuration File,” click Download. This will download a YAML file named config.yaml containing everything you need to authenticate the Gremlin agent to your Gremlin account and team.
Now, let’s create the EC2 instance:
- Log into your AWS account and open EC2.
- Click Launch instance and configure your new instance.
- Give it a Name, such as “gremlin-dependency-demo”.
- Select Amazon Linux 2023 or later as the Amazon Machine Image (AMI). You could use another AMI as long as Gremlin supports it, but the instructions in this tutorial will assume Amazon Linux 2023.
- Select an Instance type. You can use a free-tier-eligible type, like t2.micro.
- Select or create a key pair to connect to your instance over SSH. Alternatively, you can just use EC2 Instance Connect to connect to your instance via your browser.
- Create or select a security group. Make sure to allow SSH traffic if you plan to use SSH to connect to your instance. You’ll also need to allow inbound traffic over port 3000 to access the application.
- Leave the remaining options set to their default, or configure them how you wish, then click Launch instance.
- Once your instance is up and running, connect to it using EC2 Instance Connect, SSH, or your preferred method.
In your EC2 instance’s shell, install the Gremlin agent by running the following commands (assuming Amazon Linux 2023 or later):
Finally, we need to apply the client configuration file so the agent can authenticate with Gremlin:
- In a text editor like nano or vim, open
/etc/gremlin/config.yamland replace its contents with the contents of your client configuration file. Save your changes. - Restart the Gremlin agent by running
systemctl restart gremlind.
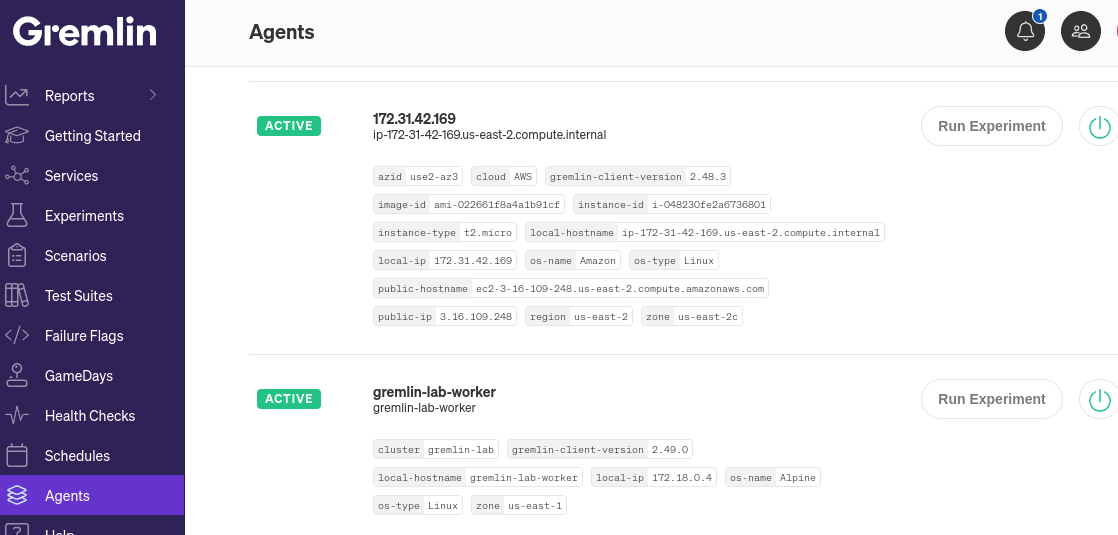
You can check whether the agent was installed correctly by opening the Gremlin web app and checking the Agents page.
Step 2 - Deploy an Amazon RDS database
Next, let’s create our RDS database. This database will act as our dependency.
- Log into your AWS account and open RDS.
- Select Databases from the nav menu, then click Create database.
- Select Easy create as the database creation method.
- Select MySQL as the engine type.
- Select Free tier as the DB instance size.
- Enter an Identifier for your database, such as “gremlin-dependency-demo”.
- Enter a Master username for the database. Make sure to remember this!
- Choose Self managed for credentials management and enter (or autogenerate) a password. You’ll need to remember this, too!
- Expand the Set up EC2 connection section, then click Connect to an EC2 compute resource. In the EC2 instance dropdown, select the instance you created in step 1 of this tutorial.
- Click Create database.
AWS will provision and create your database with the username and password specified, and the EC2 connection will allow our instance to connect to the database. The last thing we need to do is create a database and table for the tasks application.
To do this, connect to your EC2 instance using EC2 connect or SSH. Once you have a terminal window open, enter the following comment. Replace HOSTNAME with the hostname of your RDS instance, and DB_USERNAME with the username of your database user. You’ll be prompted to enter the user’s password after entering the command.
From here, we’ll run two scripts: the first creates a database named “todo”, and the second creates a table named “tasks”:
Now we’re ready to deploy our app and connect it to our database! Type quit to close the MySQL client.
Step 3 - Deploy a Node.js application to your EC2 instance
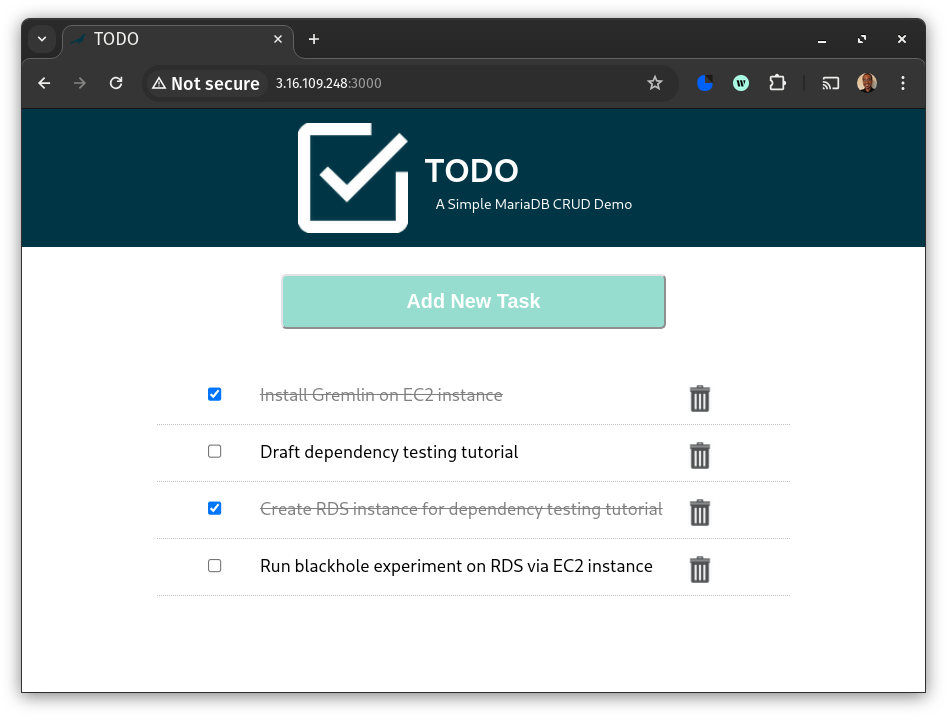
Now that we have an EC2 instance and database, let’s deploy the application. We’ll use the same application that we used in an earlier tutorial on using Gremlin with Amazon RDS. This application is a simple to-do list presented as a website.
In your EC2 instance’s console, install git and Node.js:
Next, clone the example repository:
This application has two components: an API service, and a client service. Let’s start with the API service. Run these two commands to change to the API component’s folder and install the necessary libraries:
When running the API, we’ll provide our database connection details as environment variables. In the following command, replace the following strings:
YOUR_HOST: Your MariaDB server’s hostname.YOUR_PORT: Your MariaDB server’s port number.YOUR_USER: The username you want to use to log in to MariaDB.YOUR_PASS: The password used to log in to MariaDB.
If the database you created in step 1 has a different name other than "todo", replace DB_NAME=todo with DB_NAME=[your database name].
Now, we can start the client. Open a new terminal window and run the following commands:
You should now be able to open your EC2 instance’s public URL over port 3000 in your web browser and see the application’s main page. If the page doesn’t appear, or if you see an error message, you might need to check your database connection parameters. Alternatively, try using plain HTTP instead of HTTPS.
Step 4 - Run an experiment on your Node.js application
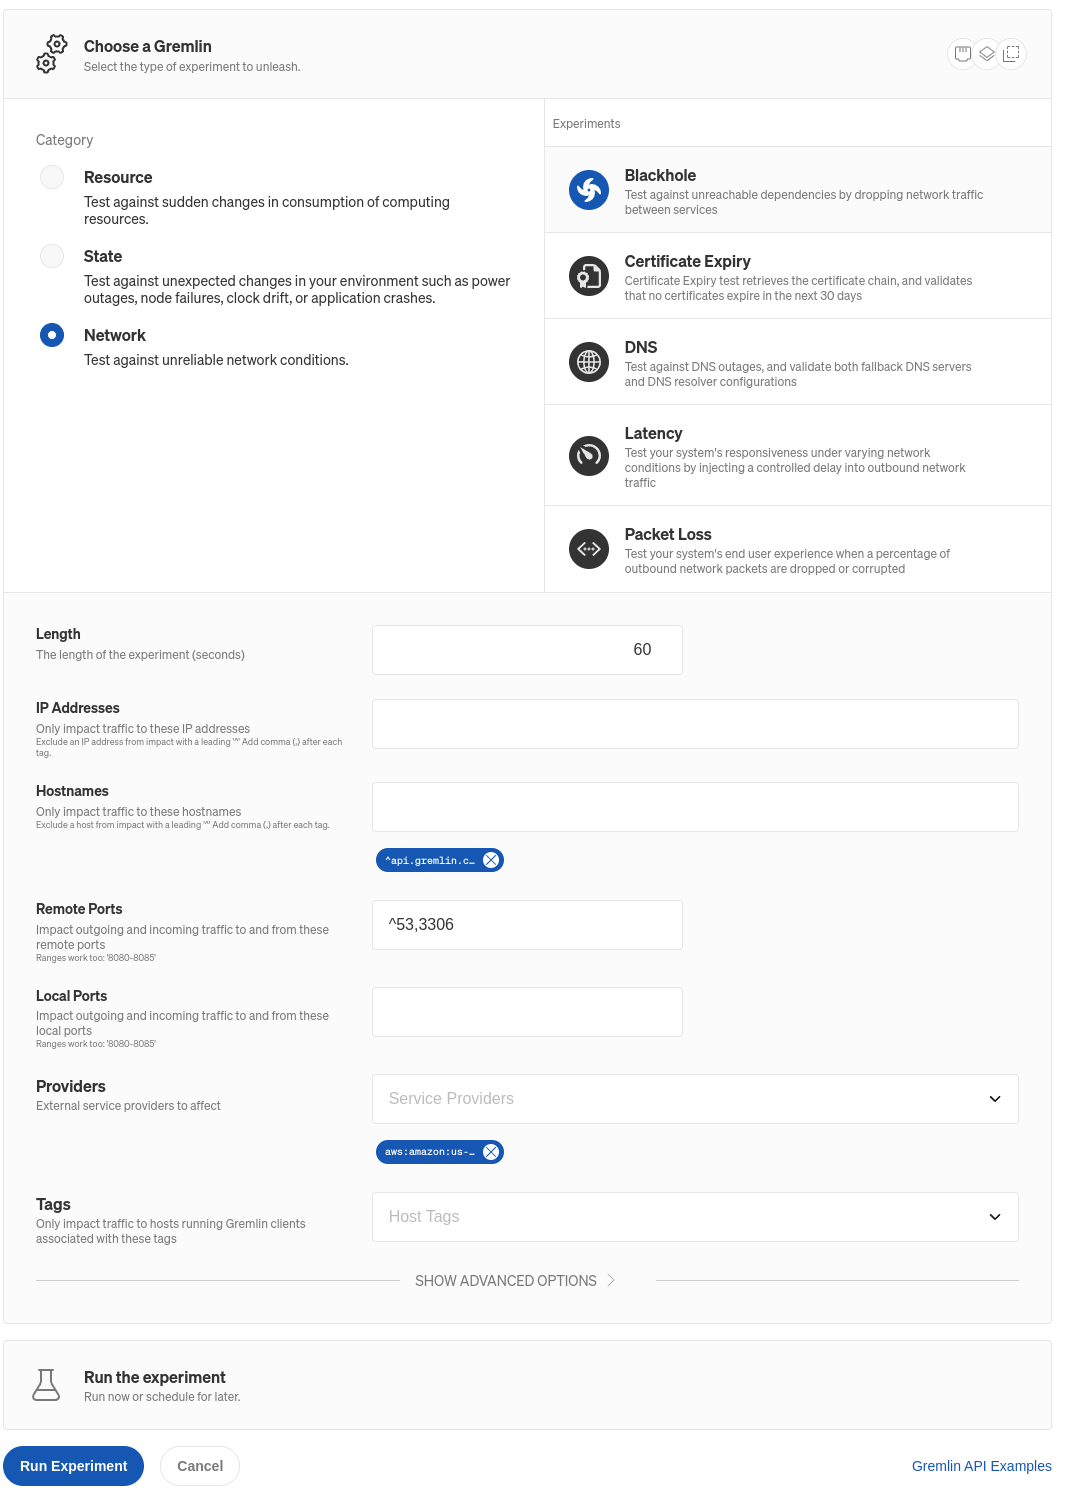
Now that our database and application are up and running, we can run our experiment. We’ll run a blackhole experiment, which drops network packets. Gremlin’s blackhole experiment can be customized to target specific packets based on the destination hostname, port number, protocol, and IP address.
- Log into the Gremlin web app.
- Select Experiments from the nav menu, then click New Experiment.
- Select Hosts, then select your EC2 instance. The easiest way to do this is to search for your EC2 instance by name, ID, or IP address.
- Click on Choose a Gremlin, select the Network category, then select Blackhole.
- Click on the Service Providers drop-down and search for “RDS”.
- In the Hostnames box, enter the hostname of your RDS instance.
- Set the value of the Remote Ports box to
^53,306(if you’re using a non-standard port number, enter it instead of 3306). - Optionally, in the Providers box, type in the name of the availability zone where your RDS database is running. For instance, if it’s running in us-east-2, select “aws:amazon:us-east-2”.
- Click Run Experiment.
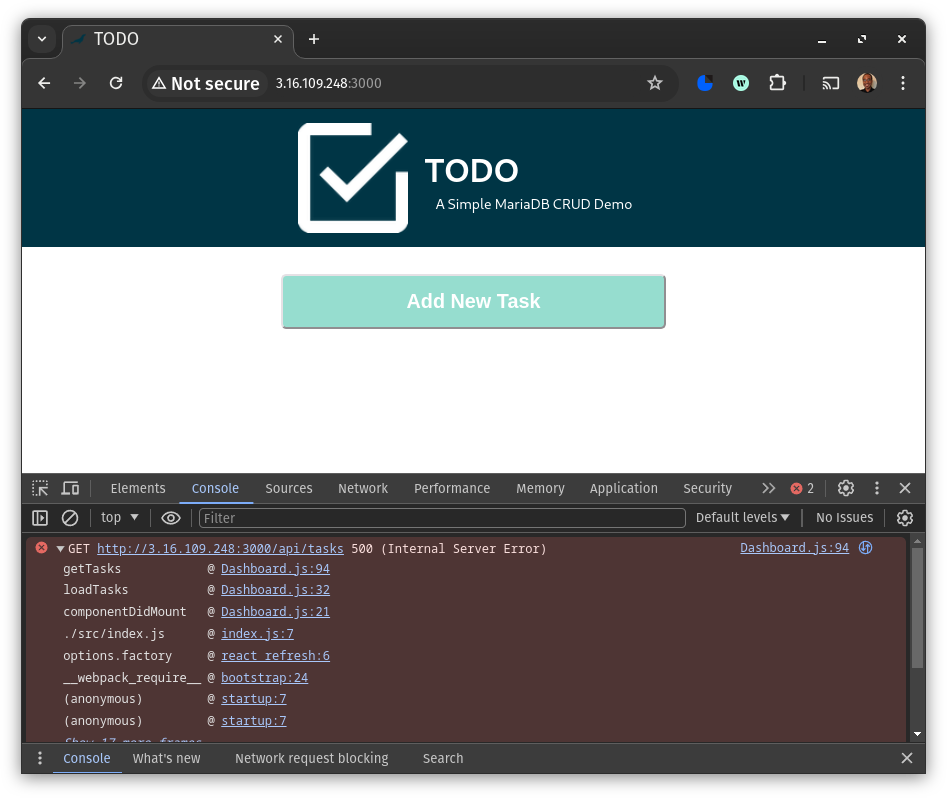
Once the experiment enters the “Running” state, try opening your web application in a browser. Do you notice anything unusual? Is the application displaying an error message, or taking longer than normal to respond? Did the application crash? What happens when you try performing an action that queries the database? This is your opportunity to observe the application, take notes, and think of ways to reduce the impact caused by the dependency failure.
Try this next
As an additional challenge: what could you do to prevent a dependency failure in the first place? In this example, we tested what would happen if we completely lost access to our database. In the real world, it’s far more likely that services will have partial outages in specific zones or regions.
As an optional follow-up, try converting your RDS database into a multi-AZ deployment, then repeat the test. Do you still get an error? Was there any impact to website performance or traffic throughput? If not, then you’ve successfully found a way to make your dependencies more resilient, which in turn, makes your application more resilient!
Avoid downtime. Use Gremlin to turn failure into resilience.
Gremlin empowers you to proactively root out failure before it causes downtime. See how you can harness chaos to build resilient systems by requesting a demo of Gremlin.

.svg)